|
|
Updated Nov 22nd 2020 - Update list of
compatible hard drives. Updated Jan 11th 2020 - Add Tivo Edge Updated Sept 25th 2017 - Update hard drive listing including new, more reliable, Tivo Bolt hard drives. Plus note about use of solid state drives. Updated Oct 18th 2016 - Add note about Windows 7 compatibility mode for MFSR on Windows 10 (thanks Arch) and add caution about 4TB Seagate 2.5" drive reliability. Updated Sept 25th 2016 - Add MFSR 1.0.4 support 8TB drives. Updated Aug 3rd 2016 - Update Tivo Bolt instructions since 3TB drives now appear to work without formatting on the latest Tivo Bolts. - Thanks Ed. Updated June 1st 2016 - Add note about deactivating apps such as VUDU before moving a drive to another Tivo. - Thanks Bob. Updated May 28th 2016 - Add note that while Premier supports 4TB drives only 2.3TB will be used. Updated May 6th 2016 - Remove STEA4000400 from recommended Bolt drives since Amazon reviews state the latest models do not come with sata connections on the drive. Updated Apr 10th 2016 - WinMFS registration page is now a scam page. Remove the link and just link to the file directly so no registration is needed. Registration requirement is considered abandoned. Updated Feb 16th 2016 - Update Bolt drive options, fix paypal link and add note about needing a T-9 on the Bolt - Thanks Gary. Updated Feb 2nd 2016 - Update blessing method for Roamio and BOLT. Add more detailed BOLT info. Thanks tivobw. Updated Nov 13th 2015 - Complete rework of Roamio and BOLT methods to reflect latest approaches and support 3,4,5 and 6 TB drives. Add notes how to fix hardware #51 and V312 errors. Updated Nov 11th 2015 - Fix typos and add additional info in places. Add note about not using Tivo Mini Power Supply (thanks to Richard Wilcox). Add note about recent problems with Cisco Updated Oct 14th 2015 - Add notes about potential risks using Roamio 4TB image for BOLT. Updated Oct 8th 2015 - Add instructions for 2, 3 & 4TB Tivo BOLT. :-) [Thanks to Michael Boulanger for his hard work testing this.] Updated Oct 1st 2015 - Add info for Tivo BOLT and additional pics of Tivo Roamio. Updated Aug 19th 2015 - Fix typo in 4TB Roamio instructions - sda -> /dev/sda Updated Jul 15th 2015 - Add instructions for 'blessing' 4TB drives for use with Tivo Roamios. Updated May 7th 2015 - Add note about >4TB drives not being supported by Roamio and Premiere. Updated Mar 26th 2015 - Fix typo that suggested 2TB drives were limited to Roamio and Premiere. Updated Mar 1st 2015 - Include new Tivo Roamio OTA to list of supported models. Updated Jan 20th 2015 - Add more detail about when setting the drive power management may not work. Updated Jan 12th 2015 - Clarify recommended hard drives and updated model numbers. Updated Dec 9th 2014 - Update procedure for recovery boot of TiVo Roamios. Updated Oct 26th 2014 - Simplify which method works with which TiVo Model and update list of recommended hard drives. Add note about new Virgin Media TiVos. Updated Apr 14th 2014 - Add note about Roamio Torx screw being smaller. Updated Jan 15th 2014 - Add instructions for recovering a faulty hard drive. Updated Jan 14th 2014 - Add note about Romio method being unconfirmed on US systems. Updated Dec 12th 2013 - Add note about simple Samsung Virgin Media TiVo upgrade approach. Updated Dec 1st 2013 - Added confirmed upgrade info for TiVo Roamio Updated Aug 22nd 2013 - Add note about new TiVo Roamio Updated Jul 17th 2013 - Add note about reports that >2TB drives appear to now be supported. Updated May 17th 2013 - Clarify description of screw sizes on hard drive bracket. Updated 3rd Jan 2013 - Update wdidle command line + new hard drives. Updated 1st Nov 2012 - Add new Tivo Models. Updated 30th May 2012 - Add notes about drives >2TB not being supported. Updated 24th January 2012 - Add notes from William Lynch regarding USB HD adapters. Updated 27th September 2011 - Add note about tamper resistant Torx Screws Updated 16th September 2011 - Add new hard drive versions and links. Updated 16th June 2011 - Add information regarding successful upgrade of Virgin Media (UK) Tivos - thanks Ian Updated 13th June 2011 - Add note about XP compatibility jumper on Advanced Format Drives - thanks Andrew Updated 9th June 2011 - Add info about problems upgrading WeakKnees drives - thanks Don Updated 8th June 2011 - Add information about WDIDLE3 for EURS drives Updated 14th April 2011 - Add notes about EARS drives being recommended only for TiVo Premiere. Updated 2nd Jan 2011 - Add notes about OEM drives suggested by Peter Belknap Updated 24th Dec 2010 - Add notes about Standby and SATA ports in bios suggested by Barry Kim. Updated 14th Dec 2010 - Add link 1.5TB EVDS drives. Updated 2nd Dec 2010 - Add instructions for Tivo Premiere Updated 6th June 2010 - -r 4 option no longer required with the latest MFSLive. Updated 18th May 2010 - Add note about opening case from Laurence Updated 13th Mar 2010 - Add information about new Tivo Premiere. Updated 1st Feb 2010 - Add note about 80 pin cables for Series 2 TiVos - based on feedback from Eric Zanovitch. Updated 24th Dec 2009 - Add recommendation for WD10EVDS Drives Updated 9th July 2009 - Add note about admin access requirement in Windows. Updated 3rd July 2009 - Add note about external drive options. Updated 5th Jun 2009 - Make Windows approach more prominent. Add warning about 1TB+ disks. Updated 17th Apr 2009 - Notes on issues with 1TB+ drives and links to new WD AV optimized drive. Updated 13th Mar 2009 - New 2TB+ drives and notes about upgrading TiVos with external disks. Updated 29th Mar 2009 - Thank you to Ronny Nussbaum for grammatical and other minor fixes. The following is a step by step guide to upgrading your TiVo Edge, TiVo Bolt, TiVo Roamio, TiVo Roamio OTA, TiVo Premiere, TiVo Series 3, TiVo HD PVR or TiVo Series 2 Digital Video Recorder to a larger capacity hard drive. It also provides instructions on how to replace a faulty hard drive which typically manifests itself as a TiVo freezing or continually rebooting. For UK customers it explains how to upgrade the Virgin Media Branded TiVos which are simply rebranded TiVo Premiere / Roamio. Australian / New Zealand TiVos are TiVo HD's. Quick Links to Recommended Methods Note if you are looking to replace a FAULTY DRIVE in an existing Tivo, expanded or not, then please see the end of this article. Although I recommend you read through the entire article first to get an understanding of the type of replacement drive needed etc. | Fix Broken TiVo | This approach might seem daunting at first but it is actually a very simple procedure that has been done by thousands of people, many without any major computer experience. So please don't be put off by the length of this document. Just read it through once, order your replacement drive and then go through the steps for the method that matches your Tivo and computer setup and you'll have a new expanded tivo running in no time. If you want more space on your TiVo without upgrading then your options at present are to purchase a TiVo Roamio Pro or a MyDVR Expander. Unlike a number of sites that discuss upgrades I have personally tried these methods myself without problems on my series 2, TiVo HD, TiVo Premiere, TiVo Roamio and TiVo BOLT. Many users have also reported success using these methods for TiVo Series 3 and Virgin Media (UK) TiVos. It is assumed that you have a basic knowledge of PC computer hardware and that you are comfortable plugging in hard drives, cdrom drives and/or USB pen drives. You should be comfortable executing a few simple command line instructions in Linux (or Windows if you choose to use the optional Windows method discussed below) although all commands will be given to you so no knowledge of Linux itself is required. If you aren't happy making your own hard drive upgrade a number of companies sell preconfigured drives. Several of them are probably featured on the banner ads on this site.
If you buy a TiVo Premiere or Roamio HD you can now add support for multi-room and remote viewing, by including the new TiVo Stream that has full iPad, iPhone/iPod and Android remote control and streaming support (the Edge, Bolt, Roamio Plus and Pro include it internally). I highly recommend it.
Note streaming between TiVo's does not work over wifi. If you don't have an ethernet connection between all your TiVo's consider adding a MoCa bridge to provide ethernet over your existing coax network.
|
|
|||||||||||||||||||||||||||||||||||||||||||||||
|
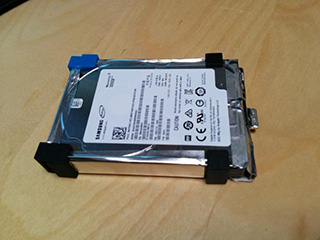
TiVo Bolt & Edge 1) A Torx T-10 & T-9 screwdriver. You can find these at Home Depot for about a buck or two or you can order a kit of all sizes online from Amazon. 2) A suitable Hard Disk to use to upgrade your TiVo. (see below). Note unlike all previous TiVo models which use desktop sized 3.5" hard drives the TiVo BOLT uses a laptop sized 2.5" hard disk. At present 2TB, 3TB and 4TB hard drives have been tested, 5TB+ drives may also work but I have not yet confirmed this. If you try a 5TB+ drive and it works please let me know. 3.5" drives also work but you need to mount the drive externally and be prepared to cut a slot in the case for the SATA cable. You will also need access to a Windows PC with SATA capability (USB SATA adapters should also work but I have not personally tested them) if you plan to use a drive > 3TB since you will need to reformat the drive using MFSR as described below after initially placing it in your Tivo BOLT. [I believe a Mac running Windows via Parallels with a USB SATA adapter should also work although I have not tested this]. There is also a Windows free option specifically for 4TB described later if you do not have access to a Windows system. TiVo Roamio / New UK Virgin Media TiVo (Samsung) 1) A Torx T-10 screwdriver (T-8 is required for the base Roamio models). You can find these at Home Depot for about a buck or two or you can order a kit of all sizes online from Amazon. For some models you will also need a Torx T-15 screwdriver since these TiVo's use T-15 screws for the Hard Drive. It has been reported that some UK TiVos have tamper resistant versions of the Torx T-10 screw. These type of screws have a little 'pin' in the middle of the star. For these you need a Tamper Resistant Torx T-10 screwdriver. Here's an example from Amazon. 2) A suitable Hard Disk to use to upgrade your TiVo. (see below). When considering which drive to purchase note that those labeled OEM are often cheaper and work just as well. Note if you plan to use a drive bigger than 3TB (currently a max of 8TB is supported) with a Tivo Roamio you will also need access to a PC with SATA capability (USB SATA adapters should also work but I have not personally tested them) to either reformat the drive using MFSR (Windows) or 'bless' it (Linux 4TB only) drive as described later. This is not required for drives < 3TB. TiVo Series 2 / TiVo HD / TiVo Series 3 / TiVo Premiere / Original UK Virgin Media TiVo (Cisco) 1) A Torx T-10 screwdriver. You can find these at Home Depot for about a buck or two or you can order online from Amazon. For some TiVo HD's and Premiere's you will also need a Torx T-15 screwdriver since these TiVo's use T-15 screws for the Hard Drive. It has been reported that some UK TiVo's have tamper resistant versions of the Torx T-10 screw. These type of screws have a little 'pin' in the middle of the star. For these you need a Tamper Resistant Torx T-10 screwdriver. Here's an example from Amazon and here's a kit with all sizes. 2) A PC with SATA capability and a CDROM/DVD
drive. (CDROM/DVD drive not necessarily required for the Windows
Method or the Premiere USB boot method) - If you are upgrading a TiVo Series 2 then you will need an
80 pin parallel ATA cable. While the HD inside a series 2 is connected
with a 40 pin cable when you plug it into your PC it needs to be
connected with an 80 pin IDE cable to work properly. Note if you are not
happy reconfiguring the insides of your PC you can also just use two USB
adapters. This will mean the process takes slightly longer but it won't
be a massive difference. You can also get such adapters very cheaply,
often less than $10 each. An example that is reported to work great is: SATA/PATA/IDE Drive to USB 2.0 Adapter Converter Cable for 2.5 / 3.5 Inch Hard Drive / Optical Drive with External AC Power Adapter 3) A suitable Hard Disk to use to upgrade your TiVo. (see below) and a spare SATA cable (TiVo HD/Premiere) if buying an OEM drive. When considering which drive to purchase note that those labeled OEM are often cheaper but do not include a SATA cable while those labeled as boxed or retail should include the SATA cable. Note the maximum hard drive size for a TiVo HD or Series 3 is 2TB and for the Premiere is 4TB although only 2.3TB will actually be used. 4) The free upgrade software:
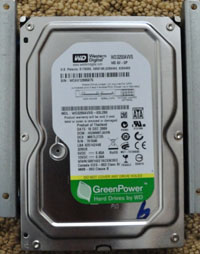
Replacement Hard Disk If you are upgrading a Roamio, Premiere, Virgin Media (UK), Series 3 or HD TiVo then you will need a 3.5" SATA hard drive. For the TiVo BOLT you will need a 2.5" laptop sized hard drive.In a TiVo HD the original hard disk is 160GB for around 20 hours of HD video. In a Series 3 it is 250GB for around 25-35 hours of HD video while in a Premiere it is 320GB (some are 500GB) for around 35 - 45 hours of HD video, an Original Virgin Media (UK) TiVo it is 500GB and a TiVo BOLT is 500GB (1TB also available) for around 75 HD hours [varies depending on input signal]. Hence you will need something bigger than this. Pretty much any SATA drive will work, however, some models are more suitable based on their power and noise characteristics. As of Sept 2017, the best hard drives for upgrading an HD compatible TiVo (except Bolt which requires 2.5" drives for which there is less choice) are the Western Digital SATA drives, particularly the WD AV-GP models which are designed for audio/video applications. Alternative that also work are the Red models, which are designed for the 24/7 usage a TiVo puts a drive through or Blue which are low power and low spin speed which makes them quiet:
I highly recommend the Western Digital drives since they are optimized for DVRs, especially the AV-GP Series or Blue series shown above although the other versions should also work fine. Drives from other manufacturers will work fine as well. The great thing about the Western Digital AV-GP and Blue series drives are that they are optimized for low power consumption and low noise. While not necessarily optimum for a desktop PC for a TiVo these properties are perfect since TiVo never really stresses the drives performance. The reduced power usage also cuts your power bill. A note on solid state drives: Until recently SSDs were too small or too expensive to be reasonably considered for a TiVo. However, prices are now such that 1 or 2TB SSDs may actually be a reasonable consideration. The enhanced performance of an SSD will have no impact on how your TiVo runs or how responsive it is so the only real consideration is trying to make either an incredibly quiet TiVo, for use in a bedroom for example, and/or trying to optimize power usage as much as possible. That said while an SSD should work it must be noted that, unlike a regular computer the TiVo is writing to the drive 24 hours a day. As such it is entirely possible that a TiVo would potentially exceed the max lifetime write capacity of an SSD prematurely. As such I would not recommend them at this time, however I would be interested in feedback from anyone who has an SSD based TiVo running successfully. Note: If you are upgrading a TiVo series 2 single or dual tuner model then you need a Parallel ATA Drive (UDMA 133 is best although UDMA 100 drives should also work). Once you have everything you need you are ready to begin the upgrade process and unlock the true power of your TiVo. TiVo HDs / Series 3s and Premieres with External Drives
A note of caution: If you are planning to upgrade a TiVo Bolt, Roamio, Premiere, HD or Series 3 that currently has an external drive connected then you will need to remove this drive before attempting the upgrade. This will result in you loosing the shows on your TiVo so I would suggest using TiVo Desktop to copy shows you want to keep onto your computer before starting. You can always copy them back once you complete the upgrade [although if your cable company sucks, like mine (Time Warner) and illegally marks most shows as copy prohibited you will not be able to do this - probably the best justification there is for using Bittorrent]. You should then power down your TiVo, disconnect the external drive and power it up again. It will complain about the external drive not being connected. Let TiVo rebuild itself to be a single drive TiVo again. Then perform the drive upgrade as detailed below. Unfortunately at present it is not possible to connect an external drive to an expanded TiVo. Select your Preferred Upgrade Method While either the Linux or Windows approach should work for TiVo HD, Series 3 or Series 2 you should select whichever you feel more comfortable with although I recommend reading through both sets of instructions below just to be sure. For TiVo Premiere the Linux approach is the only one currently available. TiVo BOLT & EDGE TiVo Roamio / TiVo Roamio OTA / Samsung Virgin Media
(UK) TiVo TiVo Premiere / Original Virgin Media (UK) TiVo TiVo HD / Series 3 / Series 2 Fix a Broken TiVo
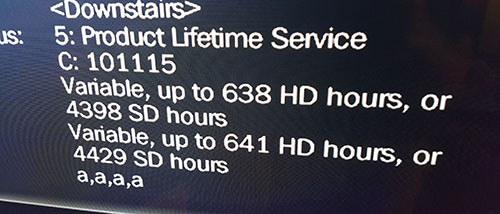
Upgrade procedures for the Tivo BOLT & EDGE have been confirmed to work on drives up to 8TB (although at the time of writing 5TB is the biggest 2.5" drive available). This requires purchase of a 2.5" hard drive. The current recommended model, in terms of cost, is a Seagate ST2000LM015 for 2TB and a Seagate ST4000LM024 for 4TB. Note this will not preserve any shows and you will be required to repeat guided setup. A 4TB drive yields a TiVo BOLT with ~630 HD hours (firmware as of mid 2016, varies by input signal). Thanks go to Michael Boulanger here for testing things and for providing the photos. Warning: The BOLT upgrade method is similar to the Roamio and it is refreshing to see that TiVo persisted with this allowing this simple procedure. However there are a couple of things you need to be aware of. Firstly this will result in you losing all of your current recordings and season passes so I suggest copying those off first to another TiVo or Tablet [if your evil cable company lets you] and using TiVo online to backup your season passes. Secondly if you use a cable card with your Tivo you may need to call your cable company to re-pair these depending on how aggressive your cable operator is with authentication [rarely required]. The procedure for the BOLT depends on whether the new drive you are using is larger than 3TB. New Drives of 3TB or Less in Size. At the time of the Tivo BOLT's release the maximum it would auto format to was limited to 2.2TB but it would appear that Tivo BOLT's with current firmware (as of mid 2016) can auto format all the way up to 3TB. Tivo EDGE is believed to be similar although I have not explicitly tested it. Thus if your new drive is 3TB in size or less then the procedure is extremely simple and makes use of the BOLT's autoformat facilities. The procedure is as follows: 1) If you purchased a cased 2.5" drive such as the STDR4000100 then first remove the hard drive from the case. This can be a little tricky. The following video may help. This step can be skipped for the OEM drives I link to above.
2) Open the TiVo BOLT. There are two screws under the cable card cover and one on the back consisting of T-9 and T-10 star screws. Once removed you should be able to carefully pry open the side of the case on the bend. Remove the stickies holding the drive cable in place, remove the single drive mount screw and you can remove the existing hard drive. Place it somewhere safe for storage. 3) Insert the new blank hard drive (if you are using a drive that was previously used in a computer you will need to blank it first by deleting the partitions in your OS) in the TiVo using the mount from the original drive. Reattach the cables, place the lid back on and secure the 3 case screws. 4) Power on the TiVo BOLT. The TiVo should boot and after several minutes will begin guided setup (if you get a message stating that there is a problem with the drive and it needs to be reformatted just press select to confirm). Go through guided setup and enjoy your new TiVo BOLT XL. :-). You can check your new recording capacity in the System Information menu. New Drives of 4TB or Greater in Size. If your new drive is greater than 4TB in size the TiVo BOLT's auto format facility will unfortunately only format the drive to a maximum size of 3TB as of mid 2016. To access the full capacity of the new drive it is necessary to either reformat it (requires access to a machine running Windows and supports up to 8TB drives) or bless it (Windows free method but limited to 4TB drives. Read warning before using this approach). BOLT Windows Method (Recommended) 1) Be sure to power on your Tivo, complete guided setup and registration and perform software updates to ensure you have the latest software version. Although not required it is best to run your new Tivo for a day or so just to make sure everything is working okay before proceeding with the upgrade. 2) This method makes use of the the awesome MFS Reformatter (MFSR) software from Ggieseke. You can obtain the latest version from this thread (registration required). If that does not work you can also get the BOLT enabled version here, but I encourage you to try to register to download it from the TiVo community thread first in case there have been any updates. Save it on your Windows Desktop or somewhere convenient. 3) If you purchased a cased 2.5" drive such as the STDR4000100 then first remove the hard drive from the case. This can be a little tricky. The following video may help. This step is not required if you purchased one of the OEM drives I link to above.
4) Open the TiVo BOLT. There are two screws under the cable card cover and one on the back consisting of T-9 and T-10 star screws. It is not as easy to open as previous Tivos but is possible with some patience. You may find the following video useful. Once removed you should be able to carefully pry open the side of the case on the bend. Be careful not to disturb any of the wires inside the case that are unrelated to the hard drive. Remove the stickies holding the drive cable in place, remove the single drive mount screw and you can remove the existing hard drive. Place it somewhere safe for storage. 5) Insert the new blank hard drive (if you are using a drive that was previously used in a computer you will need to blank it first by deleting the partitions in your OS) in the TiVo using the mount from the original drive. Reattach the cables, place the lid back but do not snap it in place. 6) Power on the TiVo BOLT. The TiVo should boot and after several minutes will begin guided setup (if you get a message stating that there is a problem with the drive and it needs to be reformatted just press select to confirm). Do NOT start guided setup just pull the power from your TiVo BOLT. 7) Remove the new hard drive from the BOLT. 8) Power off your Windows machine and connect the hard drive to your Windows computer using either a direct SATA connection or a USB 3.0 to SATA adapter. (USB 2.0 SATA adapters should also work but will be slow.). A MAC running Windows via Parallels should also work but I have not tested this, 9) Power on your Windows machine. If you are asked if you want to partition or initialize the hard drive select no (or cancel). 10) Right click on the mfsr.exe file you downloaded above and under the Compatibility tab select 'Run as Administrator'. (If you are using Windows 10 also tick the "Run this program in compatibility mode for:" box and select Windows 7. If you do not do this on Windows 10 MFSR will likely report that no Tivo drives are present). 11) Follow the instructions given by MFSR to reformat the drive to use its full capacity. The procedure is self explanatory. 12) When done close MFSR and shutdown your Windows computer. 13) Remove the new hard drive from your Windows computer, place it in your TiVo BOLT using the mount from the original drive. Reattach the cables, place the lid back on and secure the 3 case screws. 14) Power on your TiVo BOLT. Go through guided setup and once finished check that the various Apps (Netflix, Amazon, Hulu etc) are working. If they are then you are all done, enjoy your new TiVo BOLT XL. :-) If you get a V312 error [rare with the latest MFSR] then go to TiVo Central - Settings & Messages > Help > Restart or Reset > Clear and Delete Everything. And then follow the instructions. After rebooting your TiVo, going through guided setup again you should find the apps are fully working. At the end of Guided Setup you can check the capacity in the system settings. It should be > 488 HD Hours for a 4TB disk [depends on your cable company's compression rate], some people have reported up to 650 HD hours at 4 TB. Enjoy your new TiVo BOLT XL. :-)
15) Finally if you found this howto useful then please, as a token of your gratitude, consider using one of the Amazon or NewEgg links on this website, such as the one below, next time you purchase something from Amazon (anything works, maybe a new TiVo Bolt even!). Just follow the link below to get to amazon.com before adding items to your shopping cart. Alternatively please consider a small donation via paypal to help cover my server costs - even a dollar can help. Also if you have any comments, suggestions, come across any problems or have any questions please feel free to contact me at the email address above. Good luck and enjoy your new TiVo.
BOLT Windows Free Method If you do not have access to a machine running Windows then you can use the following method that involves 'blessing' your new hard drive prior to inserting it in the TiVo BOLT using a bootable CD or USB pen drive Image. Note that this approach only works with 4TB drives and you should read the warning below before proceeding. 4TB WARNING 1) Be sure to power on your Tivo, complete guided setup and registration and perform software updates to ensure you have the latest software version. Although not required it is best to run your new Tivo for a day or so just to make sure everything is working okay before proceeding with the upgrade. 2) If you purchased a cased 2.5" drive such as the STDR4000100 then first remove the hard drive from the case. This can be a little tricky. The following video may help. This step can be skipped if you purchased one of the OEM drives I link to above.
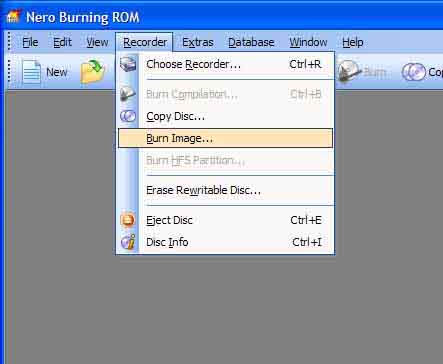
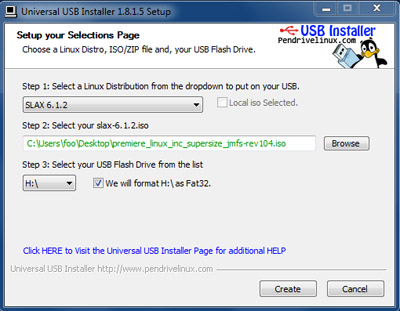
3) Download a copy of the Ubuntu Rescue Remix Linux boot CD - You can obtain a copy here. Then burn the ISO to CD (or usb pen drive). 4) Remove all existing hard drives from your PC and hook up your new drive. 5) Reboot your PC and configure the bios to boot from CDROM or USB Disk. Insert your Ubuntu Rescue CD (or usb pen drive) and let the system boot. At the boot: prompt simple press enter. 6) Read the warning above! 7) When the system finishes booting and you are given a command line enter:
8) Allow approximately 20 mins for the 'blessing' to complete - it may finish sooner. Then shutdown your PC and remove the drive. 9) Open the TiVo BOLT. There are two screws under the cable card cover and one on the back consisting of T-9 and T-10 star screws. Once removed you should be able to carefully pry open the side of the case on the bend. Remove the stickies holding the drive cable in place, remove the single drive mount screw and you can remove the existing hard drive. Place it somewhere safe for storage. 10) Insert the new hard drive that you just blessed in the TiVo using the mount from the original drive. Reattach the cables, place the lid back but on and screw it in place. 11) Power on the TiVo BOLT. The TiVo should boot directly into guided setup. Go through the guided setup - you skip as much as you want here since this is just to get to the point where you can reset everything as described in step 11. 12) Go to TiVo Central - Settings & Messages > Help > Restart or Reset > Clear and Delete Everything. And then follow the instructions. 13) When your TiVo BOLT reboots go through guided setup a second time, this time taking the time to set channels correctly etc. At the end of Guided Setup check that the apps such as NetFlix, Amazon, Hulu load okay. If you get a V312 error then repeat step 11 above. You can check the capacity in the system settings. It should be > 488 HD Hours for a 4TB disk [depends on your cable company's compression rate], some people have reported up to 650 HD hours at 4 TB. Enjoy your new TiVo BOLT XL. :-)
14) Finally if you found this howto useful then please, as a token of your gratitude, consider using one of the Amazon or NewEgg links on this website, such as the one below, next time you purchase something from Amazon (anything works, maybe a new TiVo Bolt even!). Just follow the link below to get to amazon.com before adding items to your shopping cart. Alternatively please consider a small donation via paypal to help cover my server costs - even a dollar can help. Also if you have any comments, suggestions, come across any problems or have any questions please feel free to contact me at the email address above. Good luck and enjoy your new TiVo.
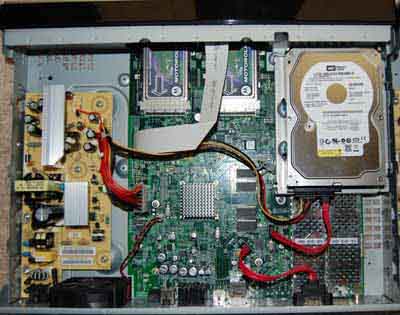
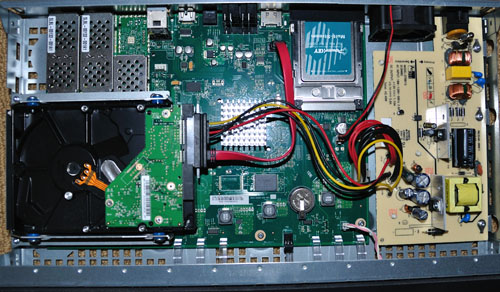
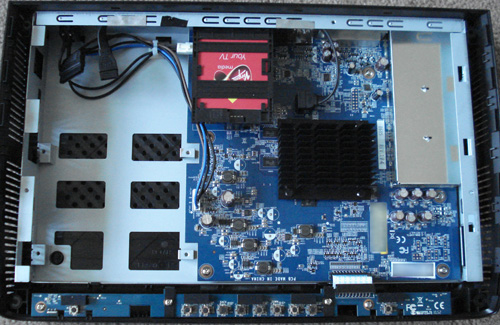
TiVo Roamio, TiVo Roamio OTA & Samsung Virgin Media TiVo (Simple Hard Drive Replacement / Blessing Method): Tivo did a WONDERFUL thing with the TiVo Roamio (and the Samsung made Virgin Media TiVo, which is a cut down Roamio based system) and continued this with the TiVo BOLT that makes upgrading the hard drive space, or replacing a broken hard drive a piece of cake. No longer is it necessary to 'bless' a new drive for use in a TiVo Roamio like it was in previous Tivos (unless the drive is >3TB in size). The new Roamio can accept a blank drive and during the booting process will automatically install the Tivo software on this drive including any hard drive space updates. This means that if you are happy losing your current recordings and season passes then all you need to do is purchase a new hard drive, such as a WD 2TB drive, open up your Tivo, remove the stock 500GB, drive, insert the new 1, 1.5 or 2 TB drive [see below if you want to add a >2 TB drive], power on and wait while Tivo initializes the drive. You should then be good to go. Warning: The Roamio upgrade method is remarkably simple and has been a long time coming, however there are a couple of things you need to be aware of. Firstly this will result in you losing all of your current recordings and season passes so I suggest copying those off first with Tivo to Go [if your evil cable company lets you]. Secondly if you use cable cards with your Tivo you may need to re-pair these depending on how aggressive your cable operator is with authentication [rarely required]. Typically this is a simple procedure of calling your cable company - although note with some, like Time Warner Cable, talking with their customer service reps about cable cards can be a bit like pulling teeth so you may need to escalate the call to get to talk to the correct person. Reports for Samsung Virgin Media customers in the UK is that the auto hard drive upgrade process works flawlessly without requiring any new pairing. If you have your new drive and are ready to go then proceed as follows: New Drives of 3TB or Less in Size. 1) Use the Torx T-10 Screwdriver to open up your TiVo (Note that the base model Roamio and Roamio OTA have a T-8 rather than T-10 so you may want to have a torx set to use here) and then remove the hard drive that is inside, note recent TiVo models require a Torx T-15 Screwdriver to unscrew the hard drive from the bracket. Be careful not to touch the power supply. Note, the only screws holding the TiVo lid are those on the back of the case. Sometimes the top can be a little stiff so you may have to slowly work it loose.
2) Carefully remove the existing tivo drive after disconnecting the cable connecting it to the main Roamio circuit board. Place it on an anti-static surface such as a piece of aluminum foil or an anti-static bag. 3) Insert the new hard drive in your Tivo Roamio and connect the cable, secure it in place. 4) Replace the lid of the Tivo Roamio, refasten the T-10 (or T-8) screws. 5) Power on and wait approximately 30 mins for the TiVo Roamio to work its magic. If you have a UK Virgin Media Tivo then you need to hold TV+Down+Record during boot. Note, if you find that after 30 seconds all 4 lights on the front of the Tivo are flashing this likely means you are using the wrong power supply (likely you switched with a Tivo Mini), switch back to the original Roamio power supply. Repeat guided setup and you should then be good to go. You can check the new capacity in system settings. New Drives of 4TB or Greater in Size. If your new drive is greater than 3TB in size the TiVo Roamio's auto format facility will unfortunately only format the drive to a maximum size of 3TB. To access the full capacity of the new drive it is necessary to either reformat it (requires access to a machine running Windows) or bless it (Windows free method but limited to 4TB drives). Roamio Windows Method (Recommended) 1) This method makes use of the the awesome MFS Reformatter (MFSR) software from Ggiesekei and supports up to 8TB drives. You can obtain the latest version from this thread (registration required). If that does not work you can also get it here, but I encourage you to try to register to download it from the TiVo community thread first in case there have been any updates. Save it on your Windows Desktop or somewhere convenient. 2) Use the Torx T-10 Screwdriver to open up your TiVo (Note that the base model Roamio and Roamio OTA have a T-8 rather than T-10 so you may want to have a torx set to use here) and then remove the hard drive that is inside, note recent TiVo models require a Torx T-15 Screwdriver to unscrew the hard drive from the bracket. Be careful not to touch the power supply. Note, the only screws holding the TiVo lid are those on the back of the case. Sometimes the top can be a little stiff so you may have to slowly work it loose.
2) Carefully remove the existing tivo drive after disconnecting the cable connecting it to the main Roamio circuit board. Place it on an anti-static surface such as a piece of aluminum foil or an anti-static bag. 3) Insert the new hard drive in your Tivo Roamio and connect the cable, optionally secure it in place since we will remove it again shortly. 4) Power on and wait approximately 30 mins for the TiVo Roamio to work its magic. If you have a UK Virgin Media Tivo then you need to hold TV+Down+Record during boot. Note, if you find that after 30 seconds all 4 lights on the front of the Tivo are flashing this likely means you are using the wrong power supply (likely you switched with a Tivo Mini), switch back to the original Roamio power supply. When you get to the first step of guided setup unplug your Tivo Roamio. 5) Remove the new hard drive from the Roamio. 6) Power off your Windows machine and connect the hard drive to your Windows computer using either a direct SATA connection or a USB 3.0 to SATA adapter. (USB 2.0 SATA adapters should also work but will be slow.). A MAC running Windows via Parallels should also work but I have not tested this, 7) Power on your Windows machine. If you are asked if you want to partition or initialize the hard drive select no (or cancel). 8) Right click on the mfsr.exe file you downloaded above and under the Compatibility tab select 'Run as Administrator'. (If you are using Windows 10 also tick the "Run this program in compatibility mode for:" box and select Windows 7. If you do not do this on Windows 10 MFSR will likely report that no Tivo drives are present.) 9) Follow the instructions given by MFSR to reformat the drive to use its full capacity. The procedure is self explanatory. 10) When done close MFSR and shutdown your Windows computer. 11) Remove the new hard drive from your Windows computer, place it in your TiVo Roamio and secure it in place using the mount from the original drive. Reattach the cables, place the lid back on and secure the case screws. 12) Power on and wait for Roamio to boot to guided setup. Go through guided setup and you should then be good to go. You can check the new capacity in system settings. It should be around 640 HD hours for a 4TB drive.
13) Finally if you found this howto useful then please, as a token of your gratitude, consider using one of the Amazon or NewEgg links on this website, such as the one below, next time you purchase something from Amazon (anything works, maybe a new TiVo Roamio even!). Just follow the link below to get to amazon.com before adding items to your shopping cart. Alternatively please consider a small donation via paypal to help cover my server costs - even a dollar can help. Also if you have any comments, suggestions, come across any problems or have any questions please feel free to contact me at the email address above. Good luck and enjoy your new TiVo.
Roamio Windows Free Method If you do not have access to a machine running Windows then you can use the following method that involves 'blessing' your new hard drive prior to inserting it in the TiVo Roamio using a bootable CD or USB pen drive Image. Note that this approach only works with 4TB drives (e.g. WD40EURX). 1) Download a copy of the Ubuntu Rescue Remix Linux boot CD - You can obtain a copy here. Then burn the ISO to CD (or usb pen drive) 2) Remove all drives from your PC and hook up your new drive. 3) Reboot your PC and configure the bios to boot from CDROM or USB Disk. Insert your Ubuntu Rescue CD (or usb pen drive) and let the system boot. At the boot: prompt simple press enter. 4) When the system finishes booting and you are given a command line enter:
5) Allow approximately 20 mins for the 'blessing' to complete - it may finish sooner. Then shutdown your PC and remove the drive. 6) Use the Torx T-10 Screwdriver to open up your TiVo (Note that the base model Roamio and Roamio OTA have a T-8 rather than T-10 so you may want to have a torx set to use here) and then remove the hard drive that is inside, note recent TiVo models require a Torx T-15 Screwdriver to unscrew the hard drive from the bracket. Be careful not to touch the power supply. Note, the only screws holding the TiVo lid are those on the back of the case. Sometimes the top can be a little stiff so you may have to slowly work it loose.
7) Carefully remove the existing tivo drive after disconnecting the cable connecting it to the main Roamio circuit board. Place it on an anti-static surface such as a piece of aluminum foil or an anti-static bag. 8) Insert the new blessed hard drive in your Tivo Roamio and connect the cable, secure it in place. 9) Replace the lid of the Tivo Roamio, refasten the T-10 (or T-8) screws. 10) Power on and wait for Roamio to boot to guided setup. Go through guided setup and you should then be good to go. You can check the new capacity in system settings. It should be around 640 HD hours for a 4TB drive.
11) Finally if you found this howto useful then please, as a token of your gratitude, consider using one of the Amazon or NewEgg links on this website, such as the one below, next time you purchase something from Amazon (anything works, maybe a new TiVo Roamio even!). Just follow the link below to get to amazon.com before adding items to your shopping cart. Alternatively please consider a small donation via paypal to help cover my server costs - even a dollar can help. Also if you have any comments, suggestions, come across any problems or have any questions please feel free to contact me at the email address above. Good luck and enjoy your new TiVo.
TiVo HD / Series 3 / Series 2 Upgrade Instructions (MFSLive Boot CD Method): Warning: Do NOT use this method
for a TiVo Premiere, Roamio or BOLT. 1) Use the Torx T-10 Screwdriver to open up your TiVo and then remove the hard drive that is inside, note recent TiVo models require a Torx T-15 Screwdriver to unscrew the hard drive from the bracket. Be careful not to touch the power supply. Note, the only screws holding the TiVo lid are those on the back of the case. Sometimes the top can be a little stiff so you may have to slowly work it loose.
2) Check the BIOS settings of your PC to make sure it is configured to boot from the CDROM drive then power off your PC and open the case. You should also check that your SATA ports are enabled in the bios. Some old PCs ship with these turned off. 3) Disconnect all of the hard drives in your PC but leave the CDROM drive attached. For this process the only hard drives you will need connected to your PC are the original TiVo hard disk and the disk you plan to upgrade to. We will be booting off of a CDROM so you don't need your PC's own operating system. 4) Check that the jumper settings on your new drive (if applicable) are set to 3.0 Gb/sec and NOT 1.5 Gb/sec. Then attach the original TiVo drive to the first SATA port and the new drive to the second SATA port. Also connect the power to these drives. 5) Power on your PC, insert the MFSLive boot cd in the drive and allow your machine to boot from it. If you are prompted with a boot menu during the boot process simply press enter to boot with the default options.
6) For me this brought up the text based terminal (even though I just let it boot the graphic mode by default). If you find yourself in some weird graphics interface then try rebooting and selecting text mode (option 3).
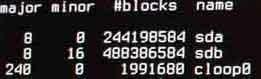
7) Next we need to identify the names of the two hard drives, your
TiVo original drive and your new 'upgrade' drive.
Make a note of the name of each drive. Make sure you get this part correct because if you mix the two up you could end up blanking your original TiVo drive and preventing your TiVo from working. In this case the 250GB drive, the TiVo original, is drive sda while the upgrade drive (a 500GB drive in this example) is sdb. (If this is a series 2 TiVo with UDMA drives then you will be looking for hda and hdb or hdc.) Note, depending on the number of shows recorded on your original TiVo drive you may see lots of partitions listed here (such as sda1, sda2 etc.). You can safely ignore these since the commands below operate on the complete physical disk (in this case the letters before the number, so sda, sdb etc.) 8) The next step is to copy over the contents of the original TiVo drive to the new drive and expand the TiVo partitions to fill the new drive. At the prompt this type the command: backup -qTao - /dev/sda | restore -s 128 -xzpi - /dev/sdb where the first /dev entry points to your source drive, the original TiVo drive, in this case sda and the second /dev entry points to the destination drive, your upgrade drive, in this case sdb. This step can take upwards of an hour on a dual core 2.4GHz AMD machine. On older machines it can take 4+ hours to compete. The options specified above are as follows:
WARNING: Make sure you have the source drive and destination drive after in the correct order. If you copy from the blank drive to the original drive you will wreck your TiVo. (although I believe the above command will give you an error if you do this - but I have never been brave enough (or foolish enough?) to try it.) If you don't want to wait several hours and don't mind loosing all your current recordings then you can use the following command which will take only a few minutes: backup -f 9999 -qso - /dev/sda | restore -s 128 -xzpi - /dev/sdb 9) At this point you are done as far as the update goes although I highly recommend you carry out the next (optional) step which will set your drive to use aggressive power management (saving you money) and maximum acoustic silencing to keep your TiVo as quiet as possible. In my experience this command has no negatives and does not appear to impact TiVo's performance in any way. Issue the command: hdparm -k 1 -B 1 -M 128 /dev/sdb where /dev/sdb is the new TiVo drive. The options here have the following effect:
Note you may get one or more errors from this command if the new drive you have selected does not support power management or acoustic management (or in the case of most new drives controls it dynamically such as new EADS, EVCS, EVDS and EURS series WD drives). In either case you can safely ignore any warnings here. If you do get an error (invalid command) you can try the following to just set the acoustic management (which may also fail on the latest drives and is nothing to be concerned about): hdparm -k 1 -M 128 /dev/sdb 10) Run wdidle3 to reset the idle time on Western Digital drives (Required for TiVo Series 3 with any WD drive. Required for ALL TiVos using WDxxEURS drives built prior to Jan 2013). For the majority of people this step is unneeded and can be safely skipped.
11) With that you are done with the upgrade. Press and hold the power button of your PC so that it powers off. Typically you need to hold it in for 4+ seconds or the PC will simply reboot. Then disconnect the old TiVo hard disk and put it somewhere safe in case you ever need to put it back in for a warranty call. Then take the new TiVo hard disk and mount it in your TiVo. Screw the cover back on, plug it all in and power it up. Once it starts simply go to the settings -> System Information menu and you should see the new increased capacity of your TiVo.
12) Finally if you found this how to useful then please as a token of your gratitude please consider using one of the Amazon or NewEgg links on this website, such as the one below, next time you purchase something from Amazon (anything works, maybe a new TiVo Roamio even!). Just follow the link below to get to amazon.com before adding items to your shopping cart. Alternatively please consider a small donation via paypal to help cover my server costs - even a dollar can help. Finally if you have any comments, suggestions, come across any problems or have any questions please feel free to contact me at the email address above. Good luck and enjoy your new TiVo.
TiVo HD / Series 3 / Series 2 Upgrade Instructions (Windows WinMFS option): Warning: Do NOT use this method
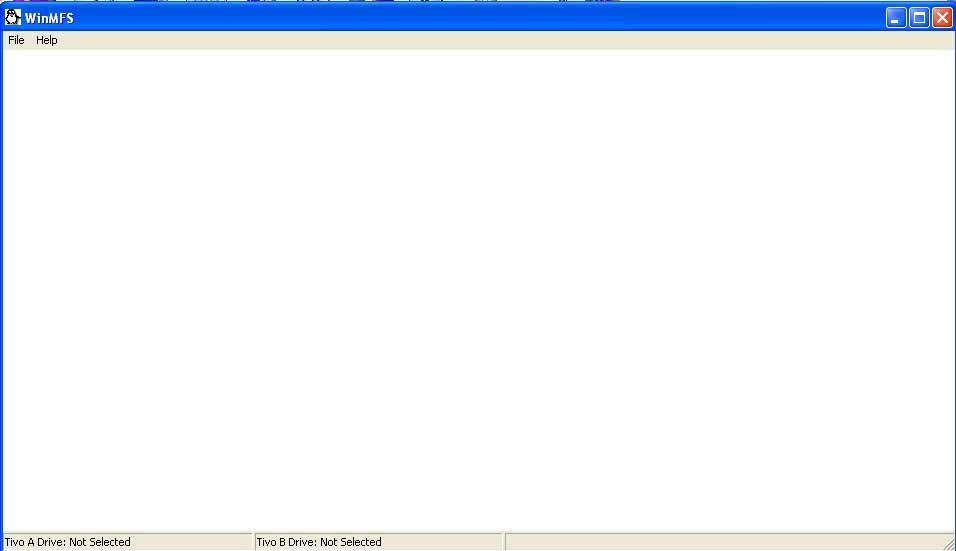
for a TiVo Premiere. If you are more comfortable using Windows than Linux then you may prefer to use this method in place of the Linux boot CD method described above. However, be aware that you need to be careful here to make sure you DO NOT INITIALIZE your TiVo disk under Windows. Doing so will blank your TiVo disk. You also need to make sure you are logged in with an account that has administrator privileges. 1) Download the WinMFS software here (if that link does not work it is also available here). The program is standalone and so does not need to be installed. Fire it up now just to make sure it is working. You should see the following screen.
at the moment no TiVo drives will be recognized since they are not connected to your PC. 2) Use the Torx T-10 Screwdriver to open up your TiVo and then remove the hard drive that is inside, note recent TiVo models require a Torx T-15 Screwdriver to unscrew the hard drive mounting and then the T-10 again to unscrew the Hard Drive from the bracket. Be careful not to touch the power supply. Note, the only screws holding the TiVo lid are those on the back of the case. Sometimes the top can be a little stiff so you may have to slowly work it loose.
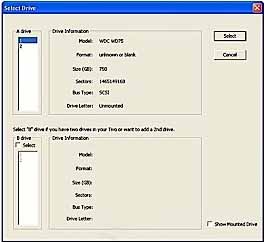
3) Check the BIOS settings of your PC to make sure it is set up to recognize all SATA drives that are connected. You should check that your SATA ports are enabled in the bios since some old PCs ship with these turned off. 4) Check that the jumper settings on your new drive (if applicable) are set to 3.0 Gb/sec and NOT 1.5 Gb/sec. Then attach the original TiVo drive to the first available SATA port and the new drive to the second available SATA port. Also connect the power to these drives. Do NOT disconnect your windows Boot Drive. 5) Power on your PC, make sure the two new drives are recognized by the bios and then let it boot into Windows. If you get any messages about initializing the new drives make sure you select No or Cancel. 6) Once Windows has finished booting run the WinMFS.exe program. Select File -> Select Drive. This will bring up the following window:
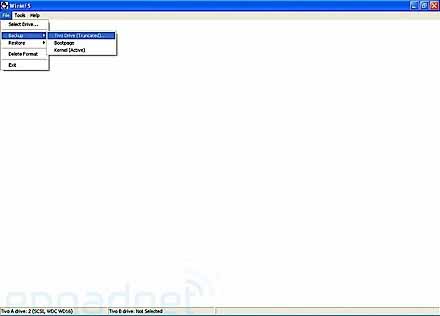
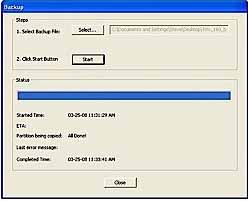
Here you need to select your original TiVo drive (under the A drive box) - make sure you highlight the correct one - for a standard TiVo HD this should be the 160GB drive. Then hit the Select button. 7) Backup your original TiVo drive. One of the neat things about the WinMFS tools is that they provide an easy way to backup your original TiVo drive to an image file that you can store on your PC or later burn to a CD/DVD for safe keeping. This allows you to reuse your original TiVo HD for something else and not have to worry if your new 'upgrade' drive should fail at some point. Hit File->TiVo Drive (Truncated) - This will backup everything except for you actual saved videos meaning the image will be small enough to fit on a CD.
This will bring up a backup options window.
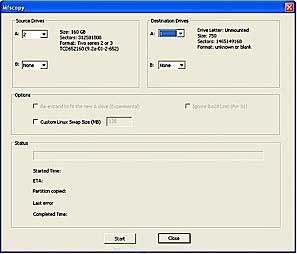
Here you just need to select the name of the file you want to backup to ad then hit start. This takes about 5 to 10 minutes depending on your hardware. 8) Next comes the actual drive upgrade. Close the backup window and hit Tools->Mfscopy. As the source drive select your original TiVo drive and under target select the new 'larger' TiVo drive.
9) Hit Start and wait. A note of caution here, avoid running anything else why this copy is running. It won't actually effect the copy but if you drag something in front of the MFScopy window it will cease to update and you won't know how far it has got until it finishes and updates the window once more. 10) Once done WinMFS will ask you if you'd like to increase the TiVo image to make use of the extra capacity of your new drive. I assume you do so hit yes. 11) Optional. If you want you can enable the Supersize option under the tools menu. This supposedly takes space that would be reserved for downloading commercials and sponsored programs and instead makes it available for recordings further increasing your capacity. 12) Run wdidle3 to reset the idle time on Western Digital drives (Required for TiVo Series 3 with any WD drive. Required for ALL TiVos using WDxxEURS drives manufactured prior to Jan 2013). For the majority of people this step is unneeded and can be safely skipped.
13) With that you are done with the upgrade. Shut down Windows and power off your PC. Then disconnect the old TiVo hard disk and put it somewhere safe in case you ever need to put it back in for a warranty call. Then take the new TiVo hard disk and mount it in your TiVo. Screw the cover back on, plug it all in and power it up. Once it starts simply go to the settings -> System Information menu and you should see the new increased capacity of your TiVo.
14) Finally if you found this how to useful then please as a token of your gratitude consider using one of the Amazon or NewEgg links on this website, such as the one below, next time you purchase something from Amazon (anything works, maybe a new TiVo Roamio even!). Just follow the link below to get to amazon.com before adding items to your shopping cart. Alternatively please consider a small donation via paypal to help cover my server costs - even a dollar can help. Finally if you have any comments, suggestions, come across any problems or have any questions please feel free to contact me at the email address above. Good luck and enjoy your new TiVo. TiVo Premiere / Original Virgin Media TiVo Upgrade Instructions (Linux Boot CD / USB Pen Drive Method): WARNING: This approach has ONLY been tested on a TiVo Premiere, Premiere 4 and Original Virgin Media (UK) TiVo This approach will also NOT work for upgrading a WeakKnees or previously expanded drive. e.g. If you purchased a 1TB WeakKnees drive for your Premiere or previously upgrade your TiVo yourself to an expanded drive you will need to use the original 320GB hard drive to perform the upgrade to your new drive
1) Use the Torx T-10 Screwdriver to open up your TiVo and then remove the hard drive that is inside, note recent TiVo models require a Torx T-15 Screwdriver to unscrew the hard drive from the bracket. Be careful not to touch the power supply. Note, the only screws holding the TiVo lid are those on the back of the case. Sometimes the top can be a little stiff so you may have to slowly work it loose. (Note the US version of the Premiere has no stickers or warranty void stickers preventing you opening the case. The Original Virgin Media (UK) branded TiVo Premiere includes a small sticker over one of the screw holes. This can be fairly easily removed using a sharp knife and a hairdryer. If you do it slowly enough you will not damage the sticker and can replace it should you need to.
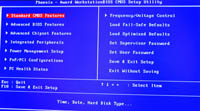
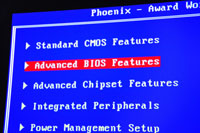
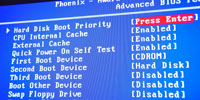
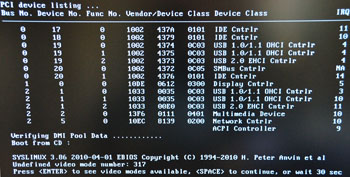
2) Check the BIOS settings of your PC to make sure it is configured to boot from the CDROM drive / or USB if you are using the USB pen drive method then power off your PC and open the case. The precise layout and menu structure of your bios will differ but mine is show below for reference. Note you often need to press 'Del' or F2 at the initial power on screen to get into the bios settings. You should also check that your SATA ports are enabled in the bios. Some old PCs ship with these turned off.
3) Open your PC and disconnect all of the hard drives but leave the CDROM drive attached (if you plan on booting from CD). For this process the only hard drives you will need connected to your PC are the original TiVo hard disk and the disk you plan to upgrade to. We will be booting off of a CDROM / USB pen drive so you don't need your PC's own operating system. It is not strictly critical that you disconnect the other drives but it will prevent you from accidentally erasing them. 4) Check that the jumper settings on your new drive (if applicable) are set to 3.0 Gb/sec and NOT 1.5 Gb/sec. The Western Digital drives are all 3.0 Gb/sec (or better) by default so you do not need to do anything to these. Next attach the original TiVo drive to the first SATA port and the new drive to the second SATA port (It is not critical that they be on these specific ports since we will be given a menu to choose from in the drive upgrade program). Also connect the power to these drives. (Note: One could also in principal use USB to SATA connectors here and plug the drives into USB ports but I have NOT tested this.) 5) Power on your PC, insert the Linux boot cd you made above in the drive (or plug in the USB pen drive) and allow your machine to boot from it. The first screen that should come will ask you about video modes. You can either wait 30 seconds for things to continue or press the space bar to continue.
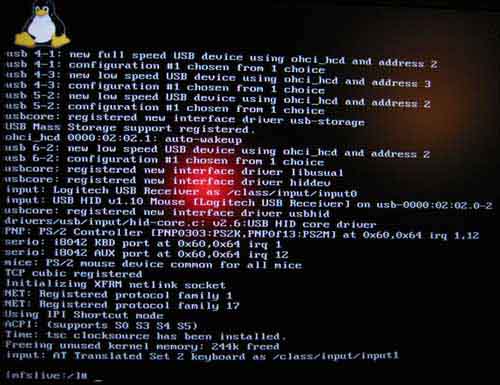
6) The Linux operating system should then boot, with a bunch of text
scrolling past of the screen. Don't worry about this. If the system
locks up or fails to recognize the drives then it is possible that your
SATA controller is not recognized. Updating your machine's bios may fix
this. If it does not please let me know the specs of your motherboard
and I will see if Linux support is available and can be added to the
image. If you have an alternative machine you can always try this one
instead.
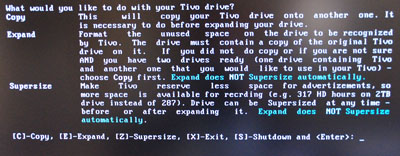
We will ultimately go through all 3 options in the following order. Copy, Expand and then Supersize. The Copy option simply copies our original TiVo hard disk to the new hard disk. Expand then expands that copy on the new disk to fill all of the available space so giving us the larger recording capacity. Finally the Supersize option modifies our new disk to have less space reserved for commercials and more for programs. This is GOOD in my opinion and gives almost a 10% boost in capacity for free. Do you really want TiVo recording 20 hours of HD infomercials? Step one is to start the copy so press 'c' and then the enter key. 7) Next we will be presented with a screen showing the indentified Original TiVo drive.
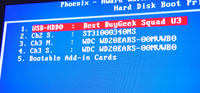
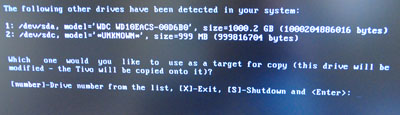
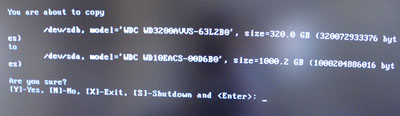
Hopefully it will only show a single drive as above. You should check this has the capacity you expect for the original TiVo. In the case of the Premiere this is 320.0 GB. Press 'Y' then the enter key to accept this drive as the source drive. If you get presented with multiple drives be sure to choose the correct on. 8) Next we need to select the target drive. At this point the program will present you with a list of available drives in the computer. This will include the USB pen drive if you booted off of USB.
In the example above you see two drives listed. My 1TB Western Digital drive and the 1 GB USB pen drive. In this case I want to have the 1TB Western Digital drive as my new TiVo drive. Make a note of the 'device' identifier of the drive. This is the /dev/xxx text since you will need it for the optional step 12 below where you turn on the drives power saving and acoustic management settings. In this case it is /dev/sda. The drive to be copied to is clearly drive 1 here so I press '1' and then enter. 9) Next the program will present you with a summary screen confirming the source and destination drives. Double check this and if all is good press 'y' and then Enter.
The program will then begin copying your original TiVo drive to the new drive. You will see a screen similar to below showing you the progress.
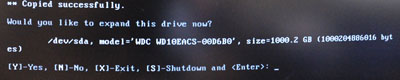
Be patient this step can take up to 3 hours. You can get an estimate of how long it will take by looking at the 'average rate' on the right of the screen. You are copying 320GB = 320,000MB = 320,000,000 kB. The rate shows the copy rate in kB per sec. So in the example above 37,650 kB / s. Hence it will take 320,000,000 / 37,650 = 8499 seconds = 2.36 Hours. 10) Once the copy completes the program should then ask you if you want to expand your newly copied drive. (If the software fails to identify the new drive this may be an issue with the way your motherboards hard drive controller functions. The simplest approach is to reboot and then skip the above steps and go straight to this expand option).
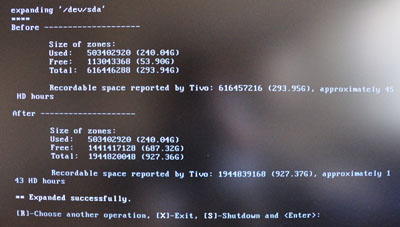
Double check that the drive report is the correct 'NEW' drive and if it is press 'y' and then enter. Then press 'y' and enter again at the confirmation page to begin the expansion process. This should complete in a matter of seconds showing you the approximate recording space on the new drive. In this case 143 HD hours (for a 1TB drive).
11) The next step is optional but recommended. Press 'r' and then enter to choose another operation. This will take you back to the main menu where you can press 'z' and then enter to Supersize your disk. This converts excess space that your Tivo reserves for downloading commercials and other sponsored junk and make it available for recording programs. It will list 'BOTH' drives since both are now TiVo drives. Make sure you enter the number for the 'NEW' drive and then press enter. Confirm again with 'y' and enter. The process will take a couple of seconds and then should complete successfully. Congratulations you are now the owner of an expanded and blessed TiVo hard drive. You can now either press 's' enter to shutdown your machine or, if you want to carry out the optional step 12 below and turn on the power saving and acoustic management settings on the new drive press 'x' and then enter. 12) At this point you are done as far as the update goes although I highly recommend you carry out the next (optional) step which will set your drive to use aggressive power management (saving you money) and maximum acoustic silencing to keep your TiVo as quiet as possible. In my experience this command has no negatives and does not appear to impact TiVo's performance in any way. Issue the command: hdparm -k 1 -B 1 -M 128 /dev/sda where /dev/sda is the new TiVo drive identified in step 8 above. The options here have the following effect:
Note you may get one or more errors from this command if the new drive you have selected does not support power management or acoustic management (or in the case of most new drives controls it dynamically such as new EADS, EVCS, EVDS and EURS series WD drives). In either case you can safely ignore any warnings here. If you do get an error (invalid command) you can try the following to just set the acoustic management (which may also fail on the latest drives and is nothing to be concerned about): hdparm -k 1 -M 128 /dev/sda 13) Run wdidle3 to reset the idle time on Western Digital drives (Only required for TiVo Series 3 with WD drive or ANY TiVo using WDxxEURS series drives manufactured prior to Jan 2013). For the majority of people this step is unneeded and can be safely skipped.
14) With that you are done with the upgrade. Type 'halt' and press enter and within a few seconds your desktop should power down. You can then disconnect the old TiVo hard disk and put it somewhere safe in case you ever need to put it back in for a warranty call or your new drive fails for some reason and you have to use the original drive to copy onto a new disk. Then take the new TiVo hard disk and mount it in your TiVo. Screw the cover back on, plug it all in and power it up. Your TiVo Premiere should start to boot and after about 3 to 4 minutes display the initial lead in video. It 'may' then go into Standby mode with a blank screen. Do not panic, just press the TiVo button on your remote to bring your new TiVo alive. Then simply go to the settings -> System Information menu and you should see the new increased capacity of your TiVo Premiere.
There you have it. As easy as pie you are now the proud owner of a massive TiVo Premiere or Virgin Media TiVo.. 15) Finally if you found this howto useful then please, as a token of your gratitude, consider using one of the Amazon or NewEgg links on this website, such as the one below, next time you purchase something from Amazon (anything works, maybe a new TiVo Roamio even!). Just follow the link below to get to amazon.com before adding items to your shopping cart. Alternatively please consider a small donation via paypal to help cover my server costs - even a dollar can help. Finally if you have any comments, suggestions, come across any problems or have any questions please feel free to contact me at the email address above. Good luck and enjoy your new TiVo. Fixing a Broken TiVo - Don't panic - it is simple. Has your beloved TiVo been freezing lately or more likely randomly rebooting? Is it outside of warranty? Are you pulling your hair out in frustration? - DO NOT PANIC - the fix is actually fairly cheap and easy to complete and could save you hundreds in repair costs for an out of warranty TiVo. For those with expensive unit lifetime subscriptions this will help you breathe even better. In 99.9% of cases the cause of a freezing or rebooting TiVo is a faulty hard drive. Often the drive is failing, taking too long to read a sector for example and this freaks the TiVo out. In most cases though the drive is not entirely past redemption and can still be read inside a computer in order to copy to a new drive. There are a number of ways you accomplish this. First you need to purchase a new Hard Drive of equal or greater capacity that the current drive you have in the TiVo. Once you have that go ahead and open up your TiVo and remove the existing drive using the method appropriate for your model as described above. Series 2, 3 and HD TiVo Mount the drives in your PC using the Linux method described above. However, when you get to step 8 replace the command with the following: backup -qTao - /dev/sda | restore -s 128 -zpi - /dev/sdb where the first /dev entry points to your source drive, the original TiVo drive, in this case sda and the second /dev entry points to the destination drive, your upgrade drive, in this case sdb. The difference is the removal of the -x (expand) option here since trying to expand an already expanded drive will give you an error. This could take between 1 and 12 hours depending on how bad your existing TiVo drive it. Hopefully though it completes successfully and you can the new drive back into your TiVo and it should magically start working again. If the above command fails then try the 'raw' disk copy method described below. Premiere, Roamio and BOLT (and series 2,3 and HD that do not work with the method above) For the latest TiVo models the best approach is to simply attempt a raw sector by sector copy of the old hard drive to the new. This works best if the two drives are identical models but can also work if they are simply the same size or the new disk is larger in size than the original disk. Most disk copies fail when they encounter a bad sector so it is critical to do this in a way that ignores and unreadable sectors. We are essentially crossing our fingers here that any bad sectors on the failing disk are inside recorded shows rather than the TiVo's actual system software - this the most likely case since the shows take up 99.99% or more of the disk. The procedure involves using the Ubuntu Rescue Remix Linux boot CD and the disk copy program ddrescue. The procedure is as follows: 1) Download a copy of the Ubuntu Rescue Remix Linux boot CD - You can obtain a copy here. Then burn the ISO to CD (or usb pen drive) 2) Remove all drives from your PC and hook up the failing TiVo drive and your new drive using the same procedure described earlier on this page. I suggest connecting the source (failing) drive to the first SATA connector and the new drive to the second SATA connector such that the original TiVo drive will be sda and the new TiVo drive will be sdb. 3) Reboot your PC and configure the bios to boot from CDROM or USB Disk. Insert your Ubuntu Rescue CD (or usb drive) and let the system boot. At the boot: prompt simple press enter. 4) When the system finishes booting and you are given a command line enter: sudo bash 5) Check your source and destination drives by running hdparm -i /dev/sda hdparm -i /dev/sdb Double check that the drive models and capacities are those you expect for the source and destination drive. 6) Begin the copying process by running the following command: ddrescue -f -n /dev/sda /dev/sdb Let this run to completion. It can take between 4 and 24 hours depending on how bad your drive is. 7) Once the copy process is complete place the new drive in your TiVo and then go through the following procedure (not always required, if your TiVo appears to be working fine after the recovery you can skip this step):
A common error that occurs when trying to fix a broken Tivo is that it displays Error #51 on startup. This normally occurs if you used the hard drive from a different (but same model) Tivo to do the copy. The drive needs to be correctly linked to the serial number of the Tivo it is in. Fortunately fixing this is easy. You simply need to tell the Tivo to clear and delete everything and then reboot it so it comes on as if it was a factory fresh Tivo. Go to TiVo Central - Settings & Messages > Help > Restart or Reset > Clear and Delete Everything. And then follow the instructions. If you find that your TiVo is giving you a V312 error when you try to access apps like NetFlix or Amazon do not panic. Well panic a little bit since you have to do a full reset of your TiVo but it is fixable. This errors seems to occur most often on TiVo BOLTs that have had the hard drive upgraded. The solution is to: Go to TiVo Central - Settings & Messages > Help > Restart or Reset > Clear and Delete Everything. And then follow the instructions. After rebooting your TiVo, going through guided setup again you should find the apps are fully working. Authentication Error for APPs It has been reported that some apps (particularly VUDU) use the system ID from the motherboard of the Tivo. This can cause problems if you move a hard drive from one Tivo to another. For example if you fix a broken Tivo by copying the drive of another identical Tivo you will likely find that a number of the Apps give authentication errors. It is unclear if all Apps are fixed by doing a Clear and Delete Everything. As such if you plan on moving a drive or drive image from one Tivo to another it is advisable to deactivate all the various apps before doing the copy. One can also simply format the drive on a PC or MAC and then repeat the copy - this is reported to have the same effect of avoiding problems with App authentication. Finally if you found this howto useful then please, as a token of your gratitude, consider using one of the Amazon or NewEgg links on this website, such as the one below, next time you purchase something from Amazon (anything works, maybe a new TiVo Roamio or Bolt even!). Just follow the link below to get to amazon.com before adding items to your shopping cart. Alternatively please consider a small donation via paypal to help cover my server costs - even a dollar can help.
Other Sites You Might Like |
|||||||||||||||||||||||||||||||||||||||||||||||||